We've been in our house over a year now and we may be nearing completion on updating the bathroom. Maybe.
Here's what she looked like when we moved in...
In all her oak-cabinet-linoleum-floor-glory.
And here she is now...
We may have painted it twice. Ok, we did. I should NEVER be allowed to choose blue paint because I NEVER like it. So we switched to a super dark charcoal gray.
We put in a new toilet, took out the mirror that was held up by plastic clips and added medicine cabinets (which was GREAT for more storage), added shelves above the toilet (some storage but mostly decorative...sorry, honey), We put in a new tile floor, a new window (we're hoping to slowly change out all the windows in the house to newer more energy efficient ones) and updated the trim. Obvi, we painted the vanity and changed out the hardware.
We also changed to a sliding barn door. I LOVE barn doors BUT this was actually a practical matter. The door opened in to the bathroom and honestly it took up valuable real estate.
Jeremy MADE the actual door itself because DANG those things are expensive to buy. The hardware can be pretty pricey too but I found a decent priced set on Amazon.
So adding a barn door on the outside opened up the wall that was behind the door...where...we...put...SHIPLAP!
Ok, it's faux shiplap but whatevs. Joanna Gaines would still be proud I just know it.
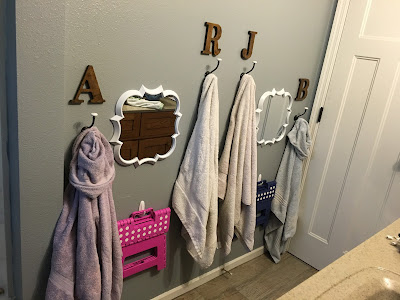
We put towel hooks up for everyone and the kids have little mirrors that are the perfect height for them. If you look closely you can also see their step stools hung up towards the bottom under their towels. Or you can see Ben's at least...
I'd love a marble counter top with undermount sinks and a tiled shower but those are pretty far down on my list right now.
Because I like Before And After pics...
Thanks for checking out my bathroom makeover!
Wednesday, October 26, 2016
Tuesday, May 3, 2016
Repurposed Towel Bar --> TIE RACK!
Yesterday I talked about how I added a little more function and organization to our bathroom. I forgot to mention that I reused that Ikea towel bar...
While Jeremy has a nice spinning tie rack that attaches to a closet rail, we don't have as much closet space in our new house so he couldn't use it. All his ties were shoved in a dresser drawer (a dresser that we got rid of for the office makeover...more to come on that). So this Ikea towel holder provided a super awesome way to store his ties so they stay neat and they are easy to see. It fits right behind the door and beside his closet just perfect!
Do I get to say I created an "Ikea hack" now? ;)
Labels:
DIY,
DIY Tie Rack,
Ikea,
Ikea Hack,
Organization,
Tie Rack
Monday, May 2, 2016
DIY Bathroom Organization
I have a blog? What??
Seriously I haven't blogged in so long I'm surprised it didn't expire or something.
BUT...here I am. We've been doing a ton of DIY projects around the house lately and I wanted to share! Lucky you. ;)

First up is this little DIY/organization project. In our new house we have ONE bathroom upstairs that we ALL share. There is no master bath. I definitely underestimated the impact of this. It's sort of a galley-style bathroom too. Not a lot of room.


Seriously I haven't blogged in so long I'm surprised it didn't expire or something.
BUT...here I am. We've been doing a ton of DIY projects around the house lately and I wanted to share! Lucky you. ;)
First up is this little DIY/organization project. In our new house we have ONE bathroom upstairs that we ALL share. There is no master bath. I definitely underestimated the impact of this. It's sort of a galley-style bathroom too. Not a lot of room.
We did have this towel bar from Ikea right next to the shower. I thought it was genius. It has four bars - there are four of us. Perfect. Not so much. It stuck out way too far and we were always having to duck under it or nearly taking out an eye.
The next problem was that when we moved in, one of the first things we did was take out the builder mirror with the ugly plastic clips and put in these mirrored medicine cabinets:

THat added some more storage and looked a lot nicer in my opinion BUT...they're too high for the kids to see themselves in. So I wanted to also figure out a place to put mirrors for them. This is what we landed on:
We have small mirrors (from At Home) that are the perfect height for the kids and they love having their very own mirror. I added hooks from Menards for each person with a cutesy letter identifying whose towel is whose. I also had just picked them each up a step stool at HomeGoods so I hung those up with a Command hook so they would be off the floor.
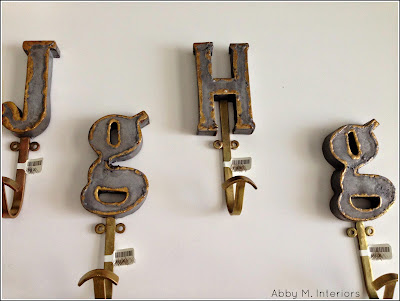
I had seen these towel hooks from Anthropologie but they're $18 each and I refused to pay $72 for towel hooks.

So I DIY'd some rustic looking wood letters using letters from WalMart that were $1.57. I "beat up" the wood first using a hammer, screws, a drill bit, and a screwdriver then put stain on them (that we already had) and put three coats of poly on top (also had on hand).
The bathroom is far from done. We did have tile put in a few months ago but still need to paint the vanity, change out the counter top and sinks, and tile the shower. And I need to pick a new paint color...
SO many more projects to come! I know you're excited!
Labels:
At Home,
Bathroom Organization,
Bathroom Update,
DIY,
DIY Bathroom,
Home Goods,
Ikea,
Monogram,
Towel Hooks
Subscribe to:
Comments (Atom)


